Henna art is all about personal expression and beauty. But let’s be real, a lot of people get intimidated by the intricate designs they see online. They think you need to be some kind of professional artist to even try.
That’s not true at all.
This guide is here to show you how to create inai simple cantik—stunningly simple and beautiful henna designs—right in your own home. By the end, you’ll have the confidence and know-how to apply your first beautiful henna design.
Creating temporary body art is rewarding, and it’s personal and beautiful. And it’s something you can do yourself.
Your Essential Henna Toolkit: What You Actually Need to Start
Let’s get one thing straight: natural henna (which gives a brown or red stain) is very different from so-called ‘black henna.’ The latter often contains PPD, a harmful chemical that can cause severe skin reactions.
Inai simple cantik is what you want, and it’s pure and safe.
To start, you need a few essential supplies:
– Pre-made natural henna cones
– Lemon juice and sugar mixture (for sealing)
– Cotton balls
– Olive or coconut oil for aftercare
Finding high-quality, safe henna cones is crucial. Check out local South Asian grocery stores or reputable online sellers. They usually have the good stuff.
Before you dive in, do a patch test. Apply a small dot of henna to your skin 24 hours before creating a full design. This helps check for any allergic reactions.
Good preparation is key. Make sure your skin is clean, dry, and free of lotions before applying henna. This ensures a better and longer-lasting stain.
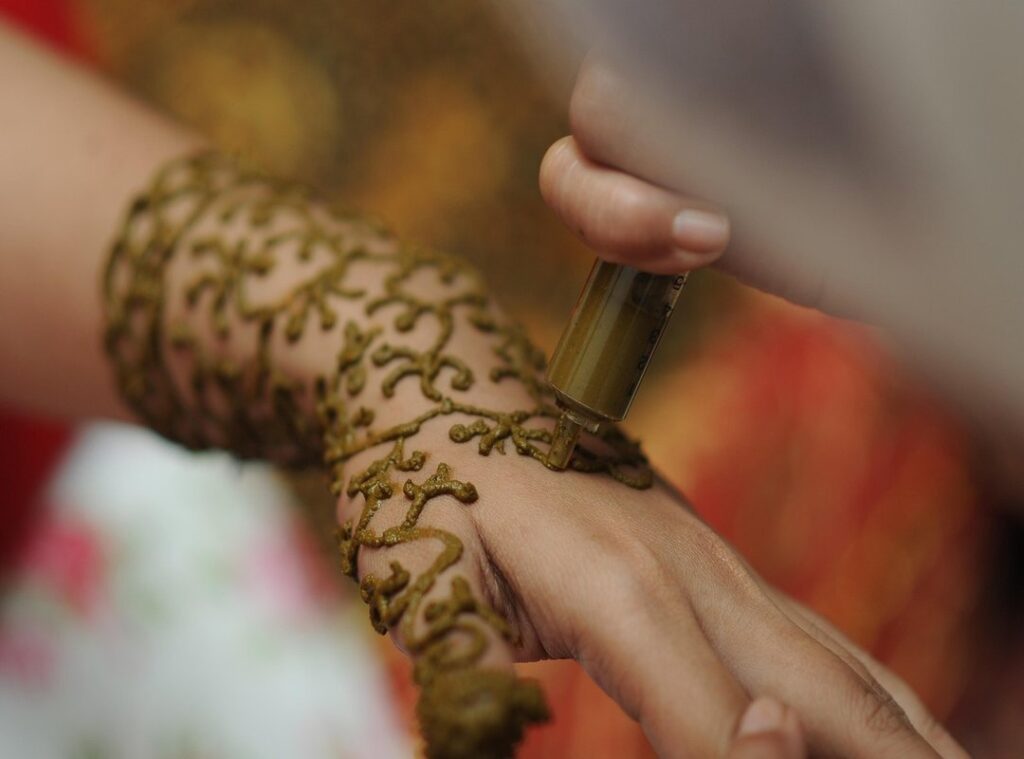
From Cone to Skin: A Step-by-Step Application Guide
Start with an anecdote about the first time I tried henna. I was so excited, but my hands were shaking, and I ended up with a big, messy blob on my hand. Not exactly the elegant design I had in mind.
But hey, we all start somewhere, right?
Step 1: Preparing the Cone
Snip the very tip of the cone to get a fine, consistent line. Start with a tiny snip; you can always make it bigger. Trust me, it’s better to start small and adjust as needed.
Step 2: Practice Makes Perfect
Strongly recommend practicing on a piece of paper first. Get a feel for the pressure and flow. Draw basic elements like lines, dots, swirls, and teardrop shapes.
It’s like learning to ride a bike—practice makes perfect.
Step 3: The Proper Grip
Hold the henna cone like a pen or a piping bag. This gives you maximum control and comfort. It might feel awkward at first, but with a bit of practice, it’ll become second nature.
Step 4: Applying Your Design
Start your design from the top down to avoid smudging the wet paste. Use light, steady pressure. It’s all about finding that sweet spot where the paste flows smoothly without gushing out.
Step 5: Fixing Mistakes
If you make a small error, don’t panic. Use a toothpick or cotton swab to gently wipe away the mistake before the paste stains the skin. It’s a simple fix, and no one will even notice.
Pro Tip: Always keep a damp cloth nearby. It’s a lifesaver for quick cleanups and keeping your workspace tidy.
Inai simple cantik is all about the little details. With a bit of patience and practice, you’ll be creating beautiful designs in no time. inai simple cantik
5 Stunningly Simple Designs for Beginners
Design 1: The Minimalist Finger Vine
Let’s start with something simple. The Minimalist Finger Vine is a design that elegantly wraps around one finger. It uses basic leaf and dot shapes to create a delicate, natural look.
Just draw a thin vine line from the base of your finger to the tip, adding small leaves and dots along the way.
Design 2: The Simple Mandala
Next up, the Simple Mandala. This design is perfect for the back of the hand or palm. Start with a central circle and add petals and dots around it.
It’s all about symmetry and simplicity. You can make it as detailed or as minimal as you like.
Design 3: Geometric Wristband
If you’re into clean lines and shapes, the Geometric Wristband is for you. Create a chic band around your wrist using simple repeating patterns. Lines, chevrons, and triangles are great choices.
Just repeat the pattern all the way around your wrist for a stylish, modern look.
Design 4: Dainty Knuckle Accents
For a subtle and elegant touch, try Dainty Knuckle Accents. Adorn your knuckles with simple dots, small flowers, or tiny crescent moon shapes. These little details can make a big impact.
Mix and match these basic elements to create your own unique, inai simple cantik designs.
Feel free to experiment and combine different elements from each design. The key is to keep it simple and have fun with it.
Secrets to a Darker, Longer-Lasting Henna Stain
The golden rule for henna is simple: leave the dried paste on your skin for as long as possible. Ideally, 6-8 hours or even overnight.
Why? The longer the paste stays on, the darker and more vibrant the stain will be. It’s like letting a cake bake fully; you get the best results with patience.
Now, let’s talk about the lemon-sugar sealant technique. After the henna paste dries, gently dab a mixture of lemon juice and sugar onto it. This keeps the paste moist and stuck to your skin, helping to deepen the stain.
To remove the paste, use a blunt edge or your fingernails to gently scrape it off. Crucially, avoid washing it off with water. Water can wash away the top layer of the stain, making it lighter and less defined.
Aftercare is key. Avoid getting water on the area for the first 12-24 hours. Moisturize the design with a natural oil like coconut or olive oil.
This protects the stain and helps it last longer.
Inai simple cantik. With these tips, you’ll have a beautiful, long-lasting henna design.
Embrace Your Newfound Henna Artistry
Creating beautiful henna art is an accessible skill, not a talent reserved for a select few. With the right materials, a bit of practice, and simple design ideas, anyone can achieve a gorgeous result.
The key to inai simple cantik is starting with basic elements and focusing on clean lines. This approach makes the process enjoyable and the outcome stunning.
Pick one of the simple designs from this article and try it out this week. Remember to enjoy the creative process.
 There is a specific skill involved in explaining something clearly — one that is completely separate from actually knowing the subject. Jeffrey Neimanister has both. They has spent years working with latest game news in a hands-on capacity, and an equal amount of time figuring out how to translate that experience into writing that people with different backgrounds can actually absorb and use.
Jeffrey tends to approach complex subjects — Latest Game News, Upcoming Game Releases, Player Reviews and Insights being good examples — by starting with what the reader already knows, then building outward from there rather than dropping them in the deep end. It sounds like a small thing. In practice it makes a significant difference in whether someone finishes the article or abandons it halfway through. They is also good at knowing when to stop — a surprisingly underrated skill. Some writers bury useful information under so many caveats and qualifications that the point disappears. Jeffrey knows where the point is and gets there without too many detours.
The practical effect of all this is that people who read Jeffrey's work tend to come away actually capable of doing something with it. Not just vaguely informed — actually capable. For a writer working in latest game news, that is probably the best possible outcome, and it's the standard Jeffrey holds they's own work to.
There is a specific skill involved in explaining something clearly — one that is completely separate from actually knowing the subject. Jeffrey Neimanister has both. They has spent years working with latest game news in a hands-on capacity, and an equal amount of time figuring out how to translate that experience into writing that people with different backgrounds can actually absorb and use.
Jeffrey tends to approach complex subjects — Latest Game News, Upcoming Game Releases, Player Reviews and Insights being good examples — by starting with what the reader already knows, then building outward from there rather than dropping them in the deep end. It sounds like a small thing. In practice it makes a significant difference in whether someone finishes the article or abandons it halfway through. They is also good at knowing when to stop — a surprisingly underrated skill. Some writers bury useful information under so many caveats and qualifications that the point disappears. Jeffrey knows where the point is and gets there without too many detours.
The practical effect of all this is that people who read Jeffrey's work tend to come away actually capable of doing something with it. Not just vaguely informed — actually capable. For a writer working in latest game news, that is probably the best possible outcome, and it's the standard Jeffrey holds they's own work to.